Wednesday, May 14, 2014

Mahi Mahi Tacos with Mango Salsa


We really enjoyed these, definitely will be in the regular rotation.  The kids ate them, just deconstructed.  I'm not an avocado fan, so I omitted that from the original recipe, but if you like avocado, I'm certain it would add another layer of texture. I would say, start to finish, this took about 40 minutes.  However, some of the prep work could be done ahead of time like making the salsa and sour cream sauce. 

Mahi Mahi Tacos with Mango Salsa
Adapted from

{need}


  • 4 Mahi Mahi fillets (thawed) approximately 4oz each
  • Olive oil
  • Favorite meat/poultry seasoning- used Montreal Steak
  • 1/2 cup sour cream
  • 1/2 lime, juiced
  • 1/2 tsp cumin
  • 1 tsp chili powder
  • 1 large mango -- peeled and cubed
  • 1/2 red or sweet white onion -- finely diced
  • 1 garlic clove -- finely minced
  • 1 cup fresh cilantro -- chopped
  • 1 jalapeno -- finely minced
  • 1/2 lime, juiced
  • Flour tortillas

{do}
Heat the grill to medium- hot.  Season with oil and seasoning.  Grill the fillets until the fish is golden brown on the outside and no longer translucent in the center, 3-4 minutes per side. Fish is done when it flakes when tested with a fork.  Flake fish into chunks.
While the fish is cooking, combine sour cream, lime juice, cumin, and chili powder; set aside. Genty toss the mango, onion, garlic, jalepeno, and cilantro with the remaining lime juice.
Assemble tacos with fish, mango salsa and sour cream sauce.


Wednesday, July 3, 2013

Lemon Bars


{need}

Crust
  • 1/2 cup unsalted butter (1 stick), very soft
  • 1 cup all-purpose flour
  • 1/4 heaping cup confectioners' sugar
  • 1 tablespoon cornstarch

Filling
  • 2 large eggs
  • 1 cup granulated sugar
  • 1/2 cup lemon juice
  • 2 tablespoons half-and-half (whole milk or cream are okay)
  • 2 tablespoons all-purpose flour
  • 2 teaspoons lemon zest loosely packed, or to taste (see note below)
  • confectioners' sugar, for dusting


{do}
Preheat oven to 350F. Line an 8-by-8-inch pan with aluminum foil, spray with cooking spray; set aside.

Crust 
  • Combine all ingredients and cut the butter into the mixture with a pastry cutter until it balls up pea sized and smaller
  • Pour mixture into pan and press with fingertips or a fork, prick the crust with your fork a few time to allow air to escape
  • Bake for 12-15 minutes, just until set, not golden brown

Filling
  • Combine eggs, sugar, lemon juice, and half and half- whisk until smooth
  • Add flour, whisk until smooth and then add in the lemon zest
  • Pour mixture over crust and bake for 15-20 minutes, just until the top is set- a little jiggle is normal
  • Cool the pan for at least one hour, then cover and refrigerate for another 3 hours or overnight.  
  • Slice and serve  
  • Oh and dust those bad boys with powdered sugar


Tuesday, July 2, 2013

Barbecue Chicken Pizza


Oh holy heavens.  Make it now.  Thank me later.


{Need}


  • 1 pizza crust- whatever you like- I'll include my recipe below
  • 1 large Boneless, Skinless Chicken Breast
  • 1 can chicken broth
  • 2/3 cup Barbecue Sauce
  • 1 Tbsp Olive Oil
  • 1 cup Shredded Mozzarella Cheese
  • 1/2 whole Red Onion, Cut In Half And Sliced Very Thin
  • Chopped Cilantro, to taste

{Do}

Put chicken breast and chicken broth in a slow cooker on high for 3-4 hours, until it shreds easily.  Remove and mix with 1/3c barbecue sauce.  Set aside.
Preheat oven to 400 degrees.
Brush a sheet pan with the olive oil. Stretch out pizza crust. Lay it on a sheet. Drizzle a little olive oil on the crust, I just use the little bit on the brush used from the pan.
Spread the remaining 1/3 cup of BBQ sauce on the crust and spread it evenly. Top sauce with 3/4 cup of the mozzarella. Sprinkle on the shredded chicken and thinly sliced red onion.
Sprinkle with the remaining 1/4 cup mozzarella, then bake for 15 to 20 minutes, or until crust is golden brown and toppings are bubbly.
Remove from the oven and sprinkle on plenty of chopped cilantro. Cut into squares and serve immediately. 

I make my pizza dough in a bread maker.  
  • 3 cups flour
  • 7-8 ounces water
  • 1 1/2 tsp active yeast
  • 1 tsp salt


Adapted from Pioneer Woman's CPK BBQ Chicken Pizza

Sunday, June 30, 2013

Chewy Brownies


{need}
  • Butter, to grease the dish
  • 1/2 cup natural (not Dutch-processed) unsweetened cocoa powder 
  • 1 1/2 teaspoons instant espresso powder
  • 1/2 cup plus 2 tablespoons boiling water
  • 2 oz unsweetened chocolate, finely chopped
  • 4 tablespoons butter, melted
  • 1/2 cup plus 2 tablespoons canola oil
  • 2 large eggs
  • 2 large egg yolks
  • 2 teaspoons pure vanilla extract
  • 2 1/2 cups sugar
  • 1 3/4 cups unbleached all-purpose flour
  • 3/4 teaspoon fine salt
  • 1/16 teaspoon baking soda
  • 1 cup shelled walnuts or pecans, chopped (optional)
{do}
  • Preheat oven to 350F; line a 9x13 pan with aluminum foil and coat with non-stick spray
  • Whisk the cocoa powder, espresso, and boiling water together in a large bowl. Add the chopped chocolate and whisk until melted. Whisk in the butter and oil, and then cool until lukewarm.
  • Whisk in the egg, egg yolk, and vanilla until smooth, then whisk in the sugar.
  • Add the flour, salt, baking soda, and nuts (if using), and stir with a wooden spoon until just combined.
  • Pour the batter into the prepared dish and bake until a toothpick inserted inside comes out moist with a couple crumbs, about 30 to 40 minutes.

Recipe adapted from the recipe for Chewy Brownies in The Best of America’s Test Kitchen 2011, Boston Common Press (2010).


Grilled Lime Cilantro Sweet Potatoes


{need}
2 sweet potatoes, unpeeled
Kosher salt
1 teaspoon finely grated lime zest from 1 lime
Pinch of cayenne pepper
2 Tbsp canola oil
Freshly ground pepper
2 Tbsp finely chopped fresh cilantro
{do}
Parcook the potatoes: Place in a pot of water and boil until fork-tender or microwave on high for 5-8 minutes;let cool. Slice each potato lengthwise into eighths.
Preheat a grill to medium or place a cast-iron grill pan over medium heat. Mix 3/4 teaspoon salt, the lime zest and cayenne in a small bowl.
Brush the potato wedges with the oil and season with salt and pepper. Grill until golden brown on all sides (including the skin) and just cooked through, about 1 1/2 minutes per side. Transfer to a platter; immediately season with the salt mixture and sprinkle with cilantro.

Monday, November 26, 2012

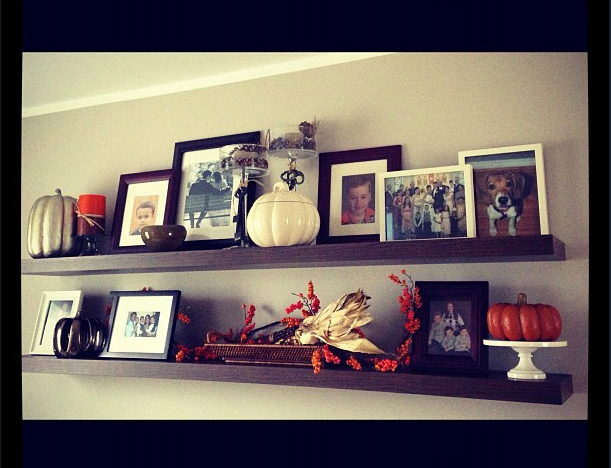
Peace Out Fall

Christmas is in full swing around these parts, so I'll get all the photos of the decor taken real soon!  But I realized I never shared the living room fall decor.  So one last piece before we say an official peace out to fall.


Sunday, November 25, 2012

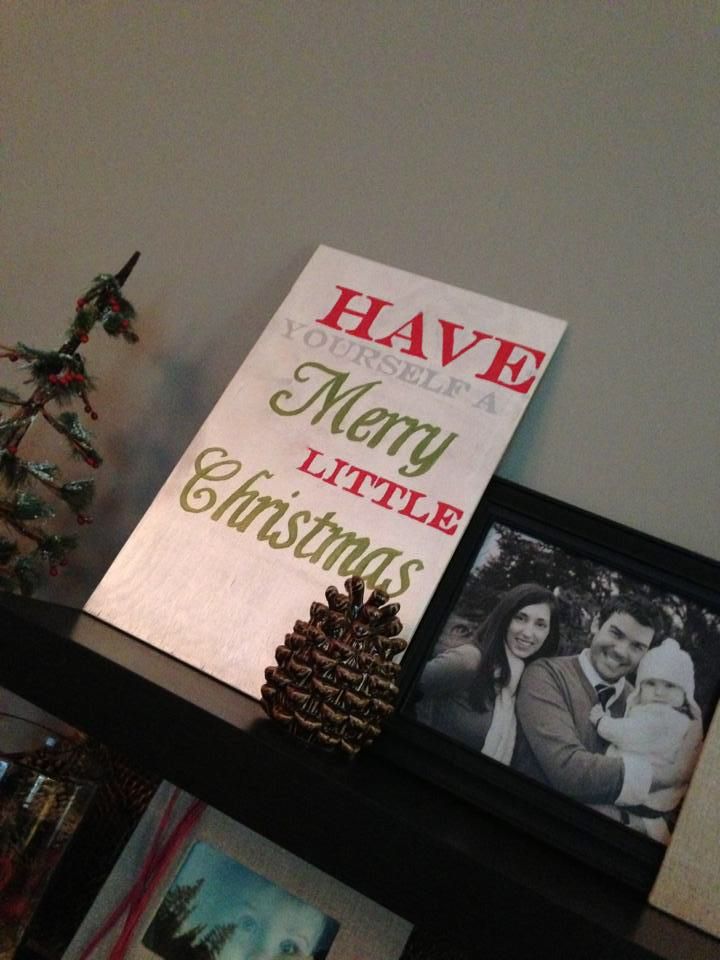
DIY Christmas Sign

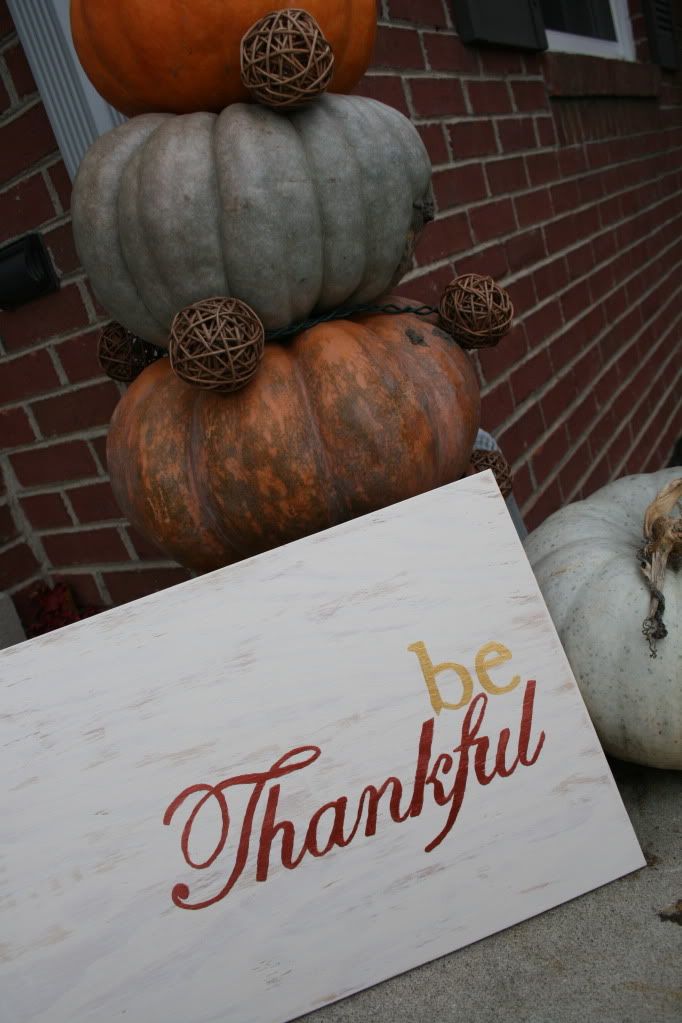
Last year, I made this adorable "be thankful" sign to add to my fall decor.

For about $17, I made what others are selling for upwards of $70.  For no additional money, I flipped the sign and made a Christmas version this year.


What you need:
  • A piece of plywood, cut to 18in x 11 1/4in
  • White Metallic Paint
  • Colored paints of your choice (For this I used a metallic green, red and silver)
  • A foam brush
  • Small paint brushes
  • Carbon Paper

1. Give the plywood a light sanding, wipe off dust

2. Using the foam brush, paint the wood with the Metallic White paint. Use long strokes and if you want the rustic look, don't worry about complete coverage. Allow that to dry for one hour.

3. Decide on a saying, font, size and placement of your saying. You can easily download different fonts at websites like www.dafont.com.

4. Print the saying out, and cut it down to the word. It doesn't have to be perfect, just cut off the major excess.

5. Tape the saying on your board as you want it, (I just did one word at a time) and place the carbon paper, carbon facing down, under your piece of paper. Trace the outline of your word.

6. Remove the carbon paper, and paint your traced word.

7. Repeat steps 4-6 until your words are complete.

8. Give your words at least 2 coats of paint to really have full coverage.  Allowing the paint to dry completely between coats helps to cover the carbon outline faster.

Wednesday, November 21, 2012

Fast Raspberry Scones

These things are amazing.  I've made 4 batches already.  If you've never made scones, this is a super easy recipe to use as a base.  It has a nice, dense quality while still being moist.  If you want to freeze them, flash freeze for 20 minutes, and store in a freezer safe bag.  To bake, just add two minutes to your bake time.  My regular time is 20 minutes, so my from frozen time is 22.  This is different from the original recipe because I don't do the small square style, I stick with the traditional triangle scone.

Fast Raspberry Scones
Original Source, Martha Stewart

Ingredients

  • 2 1/2 cups all-purpose flour, plus more for work surface
  • 1/4 cup plus 1 tablespoon sugar
  • 1 tablespoon baking powder
  • 3/4 teaspoon coarse salt
  • 1/2 cup (1 stick) cold unsalted butter, cut into small pieces
  • 3/4 cup buttermilk
  • 1 large egg yolk
  • 1 1/2 cups fresh raspberries (6 ounces)

Directions

  1. Preheat oven to 400. In a food processor, pulse together flour, cup sugar, baking powder, and salt. Add butter and pulse until pea-size pieces form. In a small bowl, whisk together buttermilk and egg yolk. Slowly pour buttermilk mixture through feed tube into processor, pulsing until dough just comes together.
  2. Transfer dough to a lightly floured work surface and sprinkle raspberries on top. Knead three times to fold in raspberries (there may be loose pieces of dough and a stray berry or two). Gather and pat dough into a 1-inch-thick square and cut or pull apart into 2-inch pieces. Place pieces, about 2 inches apart, on two parchment-lined rimmed baking sheets and sprinkle tops with 1 tablespoon sugar.
  3. Bake until golden brown, 15 to 18 minutes, rotating sheets halfway through. Let scones cool slightly on sheets on wire racks. Serve warm or at room temperature.

Monday, November 19, 2012

Chicken Stir Fry

*I have some catching up to do here...
**I will have to remember to take a better photo next time.  I was too excited to eat, and I'm lucky I had this much left.  Last time, by the time I remembered, there was nothing left to photograph.


So the base for this one comes from this recipe, and I just altered it slightly.  My changes are reflected below though.   We really loved this one and it is a super quick meal to put together.  Plus, it's just a great base with things you normally have on hand and you can use whatever vegetables you have.  Enjoy!

Ingredients:

3 tablespoons cup soy sauce
2 tablespoons worchestire sauce
1/4 cup brown sugar
1 tablespoon cornstarch
1 tablespoon minced fresh ginger
1 tablespoon minced garlic
1/4 teaspoon red pepper flakes
3 skinless, boneless chicken breast
halves, thinly sliced
1 tablespoon sesame oil
1 head broccoli, broken into florets
1 cup sliced carrots
1/2-1c cut pineapple
1 onion, cut into large chunks
1 tablespoon sesame oil
Other vegetable ideas:
1 green bell pepper, cut into matchsticks
1 (8 ounce) can sliced water chestnuts,
drained
 
Directions:
1. Combine soy sauce, worchestire sauce,  brown sugar, and corn starch in a small bowl; stir until smooth. Mix ginger, garlic, and red pepper into sauce; coat chicken with marinade and refrigerate for at least 15 minutes.
2. Heat 1 tablespoon sesame oil in a large skillet over medium-high heat. Cook and stir broccoli, carrots, and onion until just tender, about 5 minutes. Remove vegetables from skillet and keep warm.
3.
Remove chicken from marinade, reserving liquid. Heat 1 tablespoon sesame oil in skillet over medium-high heat. Cook and stir chicken until slightly pink on the inside, about 2 minutes per side; return vegetables and reserved marinade to skillet and add pineapple. Bring to a boil; cook and stir until chicken is longer pink in the middle and vegetables are tender, 5 to 7 minutes. Serve over rice.


Monday, October 29, 2012

Meal Planning Monday

Monday: Vegetable Lasagna
Tuesday: Leftovers
Wednesday: Tacos
Thursday: Oven Fried Spinach Cheese Ravioli & Salads
Friday: Chicken, Potatoes & Green Beans
Saturday: Leftovers
Sunday: Birthday Party

Thursday, October 25, 2012

Why I'm slightly Insane

Alright, I am fully aware I'm crazy.  So it's not like this is anything new.  But what could confirm it for any other person was what I attempted two weekends ago.  Like many of you, I started my "online life" through The Knot.  I transitioned to The Nest and made some great local friends.  Some of them are very dear to me.  From there, I made the move to The Bump.  I really bonded with my birth month board.  It was a great place to gush, vent, share, ask questions and everything in between.  These girls had become my lifeline to everything Cam and then some.  We have been a group for just over 2 years now since we've been "together" since we were all pregnant.  So what better way to break in the newly finished basement than by inviting the whole group of 200+ people for a huge slumber party?

Ok, ok, so not all 200 could come.  But seeing as we are spread across two countries with many miles between us, that's not really a shocker.  And I'm pretty thankful seeing as I'm not quite sure where I would put them all.  However, we did end up with 25 girls.  All in my house.  No babies.  No diapers.  No high chairs.  Just 25 moms, in the flesh.  I dubbed the weekend the most intense Facebooking of my life.  Oh and don't forget, this is all while 30 weeks pregnant :/

Luckily, Michigan has a good core group, including some Ohio mommas.  We all pulled together and made it relatively stress free.  We planned outings and dinner and each brought food and goodies to supplement. 

Here was the breakdown:
  • 13 localish girls driving less than 2 hours
  • 3 Canadians
  • 6 thought this was worthy of a plane ticket.  
  • 2 sets of 2 carpooled from Chicago and further west
  • 1 last minute drive up from Kentucky

This isn't even everyone.  But this is what we call a living room full of mommas.


Thank goodness for these local gals, as well as the rest of them!  Also: Bump Spotting- 30 Weeks 

Here is what it looks like to stuff your entire basement with air mattresses.  Oh alert. Sneak peak of the basement!

This is what happens when 25 people go out to dinner. And I think it was the first time, in the history of ever that we weren't short money with a group.  Alleluia.

All that said, I know many of you have pretty active online lives, so just in case you decide to test your sanity, here are some tips of how to make your own huge get together a little less stressful.

1. Do not attempt this alone.  There is no way I would have pulled this off without the help of roughly 9 other local girls. 
2. Keep dining out to a minimum.  It's stressful and difficult for everyone to chat anyway.  We ate out for the two dinners we had, but that was it.  Everything else was in house.
3. To make sure we had all the bases covered, the local girls had a sign up sheet to indicate what each person would bring.  This ranged from chips to main dishes to alcohol to additional bedding, and everywhere in between.
4. Paper paper paper.  Do not attempt any sort of real dishes.
5. Reservations.  Obvious one I think, but don't forget that piece.  
6. You all know I'm a major hostess.  It's just in my body.  But with this kind of event, being 30 weeks pregnant, I had to let things go.  I tried my hardest to make sure everyone was comfortable, had any necessary amenities and maintained the house the best I could, but some things got left behind.  And gasp.  I let people help.  I don't even know how much everyone else did.  It was just amazing to see 25 girls, in one house, pulling together, and spending some great quality time. 
7. I did not even attempt to have dining seating for everyone.  It was just a get in where you fit in type deal.  All the food was located on the dining room table or in the kitchen.  All the chairs were available for seating as well as the family room and living room couches.  It worked fine.
8. All luggage was upstairs near the full baths, all bedding was in the basement.  It seemed to be a good system.  
9. Just do it.  Even if you are nervous.  Even if it's just a couple people you are dying to meet.  Be safe, obviously, but don't be afraid to reach out and meet someone you feel like you've known your whole life.  It's a weekend I'll absolutely, without a doubt, never ever forget.


Monday, October 8, 2012

Meal Planning Monday

Sunday: Birthday Party
Monday Chicken Pot Pie
Tuesday: Baked Mac & Cheese and Steamed Vegetables
Wednesday: Beef Tacos
Thursday: Baked Shrimp and Vegetables
Friday: Leftovers
Saturday: Buca Di Beppo with 23 of my favorite people!  


Monday, October 1, 2012

Meal Planning Monday


Saturday: Seasoned Baked Salmon, Baked Potatoes, & Broccoli
Sunday: Vegetable Beef Stew

Monday: Out
Tuesday: Chicken Pot Pie
Wednesday:
Chili & Cornbread
Thursday: Leftovers
Friday: Tortellini & Pesto with Salads

Friday, September 28, 2012

Cheesy Bell Pepper & Herb Quiche

We had out of town guests come in late last night, so before they arrived I made a quiche to reheat in the morning for breakfast. Perfect. I can't believe I've never made a quiche before. Ridiculously easy and this one tastes amazing! It is certainly a great base and you can change up the vegetables however you like!

Cheesy Bell Pepper & Herb Quiche
original recipe from Woman's Day


  • 1 refrigerated rolled pie crust or your own 9 inch crust
  • 1 large onion, roughly chopped
  • 1 bell pepper, roughly chopped
  • 2 cloves garlic, finely chopped
  • 4 large eggs
  • 3/4 cups whole milk
  • 1/2 cup sour cream, reduced fat
  • 1/4 teaspoon ground nutmeg
  • 1/4 teaspoon Kosher salt
  • 1/4 teaspoon black pepper
  • 1/4 cup chopped fresh parsley
  • 1 cup shredded cheddar cheese
Directions
  1. Heat oven to 425 degrees F. Fit the pie crust into and up the sides of a 9-inch pie plate; fold the edge of dough underneath itself to create a thicker 1/2-inch border that rests on the lip of the plate and crimp as desired. Using a fork, prick the bottom of the crust. Place on a rimmed baking sheet and bake until lightly golden, 10 to 12 minutes. Remove, let cool slightly and reduce oven heat to 375 degrees F.
  2. Meanwhile, heat 1 tablespoon oil in a large skillet over medium heat. Add the onion and cook, stirring occasionally, for 5 minutes. Add the pepper and cook, stirring occasionally, until just tender, 3 to 4 minutes more. Stir in the garlic and cook for 1 minute; remove from heat.
  3. In a large bowl, whisk together the eggs, milk, sour cream, nutmeg, and salt and pepper. Stir in the parsley and Cheddar.
  4. Scatter the onion–bell pepper mixture over the bottom of the crust. Pour the egg mixture on top and bake until set and a knife inserted in the center comes out clean, 40 to 45 minutes. Let rest for 5 minutes. Serve with a salad, if desired. 

This could also easily be frozen and saved for another day!  

Wednesday, September 26, 2012

My Happy House: 6 Month Rundown

How do you sum up 6 months of life in one post? Let's tackle this photo style. Things to note:
1. My poor camera barely has seen the light of day, or night for that matter. Most of these are from a phone dump.
2.  Avoiding any basement photos really limited what I was working with, which showed just how much of our time was spent working on it!

March brought my birthday and some warmer weather around Michigan.  Zoo trips began for the year which were plentiful.


April brought Cam's first real Easter Egg Hunt


His first Tiger's Game- even though we aren't really counting it since we got to sit in the seats for all of 20 minutes. How about we call this Cam's first trip to Comerica Park where he went on the carousel?


And of course it brought this.....


May brought even warmer weather and a lot of outside time.  The kiddie pool was enjoyed by all.  Literally.


I was serious.  We went to the zoo a lot.


June we went on our first trip to the cabin for the year.  Weather was perfect and it was good to get away. 


More outside time because it's Cam's favorite

July we actually got to sit, and watch Cam's first* Tiger's Game.  Very important day for Cam's baseball fan parents.

We won.  That's important.

Yuckier days took us to the museum, but of course Cam still gravitates to the water.

August was a trip to the Farmer's Market.  The purple sleeve is my sister.  She's giving Cam his first proper doughnut.  His reaction is quite similar to mine every time I eat a doughnut.  Pure bliss.

I discovered Cam's love for lions and The Lion King to be exact during a basement purchase research trip. 

And don't worry, Gibson is still kicking it Beagle style.

The basement was wrapping up in August as well, and this was giving me major anxiety.  I needed this lovely scene out of my family room.

September brought another trip to the cabin.  Watch out, Cam steals ice cream cones.


While there, we attempted some family photos.  It was way easier when Cam was smaller. 


And that pretty much brings you to present day.  Phew!  I'll probably be filling in some of the gaps in future posts, but this is the basic rundown of what we've been up to the last 6 months!

Tuesday, September 25, 2012

Family Room Fall

My oh my has my blogging life changed.  Coming to you using the Mega Blocks table as a desk in the play room. :)  Apparently 6 months of life is a lot to sum up, and the basement is just as large of a project for a post.  So while I work on those, you get to enjoy my weekend project.  The start of fall decor around these parts!!


The mantle is pretty similar to last year's version.  I just loved it so much, I knew it wouldn't change a whole lot.  It's just a mix of fall products like indian corn and gourds plus some ribbon to dress up plain candles.  I put my "be thankful" sign up there this year.  We sit in this room most often, so I thought it'd be the best place for that daily reminder as we head into the holiday season. 


The floating shelves in the family room are also similar, but still different.  I wasn't 100% pleased with last year's outcome, so I definitely wanted to change them up a bit.


That sums up the family room.  I have to work on the rest of the house this week.  Have you started yours now that it is officially fall?  It's pretty much a guarantee to make your house feel cozy and warm!

Monday, September 24, 2012

Slow Cooker Chicken & Cheater Dumplings


This recipe comes from my dear friend and cousin, Allison.  It's actually Carl's cousin's wife, or as I usually say, Cam's bff's mom.  :)  It is the perfect pick me up when you are sick or on a cool fall day.  Luckily it was just the latter we were working with today!
 
 This is just slightly modified from her version

Slow Cooker Chicken & Cheater Dumplings

4 boneless/skinless chicken breasts
2 tablespoons of butter
1 (10.75 oz) can of cream of chicken soup
1 (10.75 oz) can of cream of celery soup
3 1/2 cups of chicken broth (If you use low-sodium, you will just want to add salt to taste)
1 onion, finely diced
1 cup celery, diced-

1 1/2 cup carrots, diced
Pepper to taste- about 2 tsp


*As for the dumplings… You can make your own dumplings, or use 1 (10 oz) package of refrigerated biscuit dough, torn into small pieces

 
1. Excluding the biscuits,  put all ingredients in a slow cooker on low for 8 hours or high for 4.
2. About 60-90 minutes before serving, remove chicken and pull into pieces and return to the soup mixture, place the torn biscuit dough in and cook until the dough is no longer raw in the center.

Menu Planning Monday


One thing I have been doing, just not sharing, is my meal planning.  I don't know what we would do without it.  Well, I do know.  We'd spend probably twice as much on groceries and throw out a lot of unused stuff.  Oh and my favorite, I'd be whining at 4p that I didn't know what to make for dinner and wasting a lot of energy by staring into the fridge.  Anyway, if after reading those last couple of sentences you were thinking "Is she actually talking about me?" then maybe meal planning is something you could give a try!

Monday: Slow Cooker Chicken & Dumplings (recipe up soon!)
Tuesday: Cubed Steak with Mashed Potatoes and Gravy & Steamed Vegetables
Wednesday: Potato Leek Soup & Salads
Thursday: Baked Seasoned Salmon, Baked Potatoes & Steamed Vegetables
Friday: Leftovers
Saturday: Panko Shrimp & Vegetable Fried Rice
Sunday: Out with friends


Friday, September 21, 2012

Bumping Back Into Blogging

Like I said, oh, you know, back in March, not a whole lot was going on in the Happy House other than the basement.  Yeah, that was sort of a lie.  But even I didn't know it was a lie yet. 

Introducing, Baby H2.

Coming this Christmas!!  Almost literally.  I am due 12.23.  Cam was due 1.22 and arrived on 1.24.  You do the math :)

A few people have asked me to come back to the blog world, and while I enjoy taking a hiatus here and there, I do like having the "journal" of our lives.  So, while I can't promise 100% regular posts from me, I do have some things I'd like to share!  The two posts I'll be working on for next week are what we've been up to the last 6 months and our big project- the basement!   I'm excited to share with the world what took up every ounce of "free" time we have had since March. 

So if I have any readers left out there, I know I know, you all hate the breaks, get ready for some seriously fun posts next week! 
Blog Widget by LinkWithin